BI Book Planning - Calculated Columns
Last updated 2 months ago
Calculated columns allow you to add a new, custom data value to every single row in a table based on an expression or formula.
In BI Book Planning, you can create calculated columns two ways: as a visual-only layer that doesn't save to the database, or, if configured, saved to the database alongside your other planning data.
How to create a calculated column
Planning supports two types of calculated columns:
Numeric — formula can only reference numeric fields
Text — formula can reference any field
(1) To add a calculated column press a “Calculated columns” button in upper part of the visual:

💡If you cannot see the button, you might need to enable it in visual settings (Format your visual → Button formatting → Calculated Column → Show button toggle)
(2) In Manage calculated columns window press “+” to add a new column:

(3) Specify:
calculated column name
column type (numeric/text)
calculated column formula
to select columns for your dropdown, double-click the column in the list on the right.
Formula syntax
Column references are written in square brackets: [ColumnName].
Numeric formulas support the operators +, -, *, / and parentheses ( ).
([Quantity] * [UnitPrice]) - [Discount]Empty or non-numeric source values are treated as 0. When the column type is Numeric, only numeric columns can be used; non-numeric columns appear in red in the Available columns list and cannot be inserted.
Text formulas join values with & and use quotes for literal text:
[FirstName] & " " & [LastName]
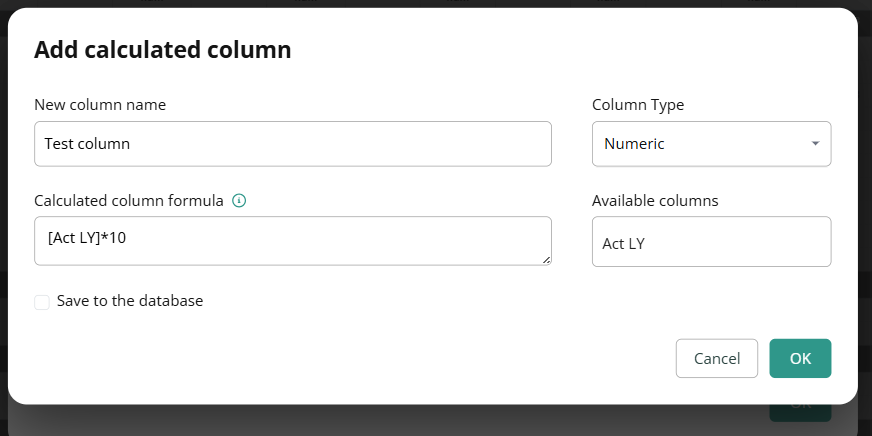
(4) Press “OK” to add the column.
Note: it is not possible to change the column type after the column has been added.
How to save calculated column to database
ℹ️ Only numeric calculated columns can be saved to database
💡Calculated column values can now be saved to the database at any time, not only at creation. Some visual settings need to be configured first to enable this.
In “Format your visual” → “Visual” → “Fields” locate your value measure, e.g. “Plan”
Make sure that “Value Measure” toggle is ON
In “API Body Key” field replace “value” with the Planning type you are saving your values under, e.g. “PL”
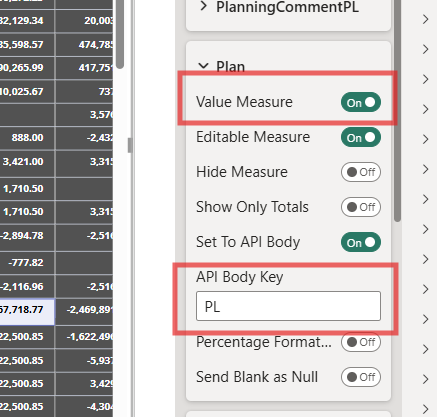
Now you're ready to proceed with configuring the calculated column.
Open an existing numeric calculated column for editing or create a new one.
Check “Save to the database”
Specify value under “Type”
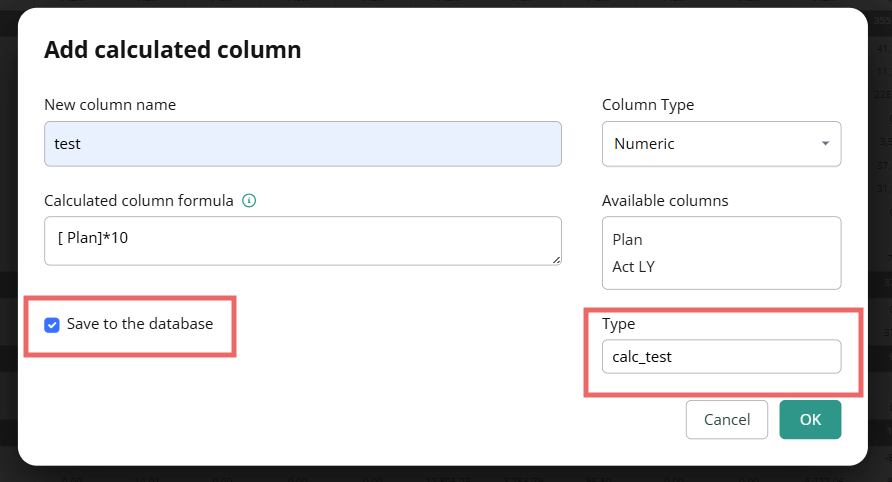
Press “Ok” to save the changes to the calculated column.
ℹ️ When you save changes to the Planning visual by pressing Save, the calculated column's values are written to the value column in the database, and the set type (e.g., calc_total) is written to the type column.
☝️If, at any point you would like to stop saving calculated column to the database, you can either uncheck “Save tot he database” in the column settings or you can simply delete the column in question.
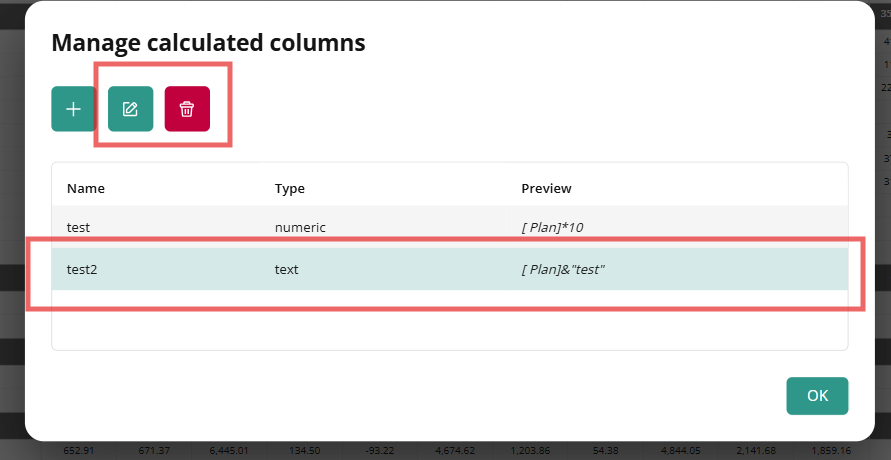
How to edit or delete calculated column
Click a column to select it, it'll highlight to confirm.
Press either “Edit” or “Delete” button respectively:
Was this helpful?
Still need help? Ask the team