BI Book Refresh Button
Custom visual that allows you to trigger single table refresh straight from you BI Book report
Last updated 21 days ago
Prerequisite
You should have Table Writeback activated in your BI Book environment
You should know tenant id, where the source report (Power BI report) lives
BI Book Refresh Button - setup guide
A button you put on a report page. When someone clicks it, the named tables in the semantic model are refreshed - without that person needing edit rights on the model, and without them leaving the report.
This guide is for whoever builds the report. It takes about ten minutes, and most of that is collecting four identifiers.
Before you start
You need five values. Four of them are identifiers you look up once; the fifth is a key you get from BI Book.
Shortcut: if a Table Writeback visual is already working against the same model, open its Format pane and copy Company ID, BI Book Domain and API Key across exactly.
Finding the Workspace ID and Semantic Model ID
Open the semantic model in the Power BI Service. The address bar reads:
https://app.powerbi.com/groups/0c0e808c-XXXX-XXXX-XXXX-XXXXXXXX/datasets/47309f77-4d93-XXXX-XXXX-XXXXXXXXX/details
                              └──────────── Workspace ID ────────────┘          └────────── Semantic Model ID ──────────┘
Both are 36 characters, in the 8-4-4-4-12 pattern. The visual checks the shape and will tell you if one is wrong.
Finding the Tenant ID
Click on your profile icon in Power BI Service > hover over info icon and copy the tenant id:
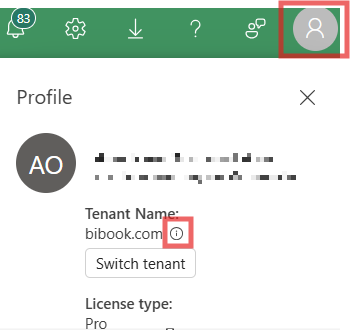
This is the single most common thing to get wrong. A wrong Tenant ID comes back as a "Not authorised" error on the button, which looks like a problem with the API Key but is not. If you see that message, check this field first.
Step 1 - put the button on the page
Open the report in Power BI (Desktop or the Service).
Import the visual file (
BIBookRefreshButton.…pbiviz) if it is not already in your Visualizations pane: … → Import a visual from a file.
The visual package is available in Planning Files.
Click the BI Book Refresh Button icon to add it to the page.
Resize it. The button sizes itself to its text, so give it a little more room than the text needs.
You do not need to add any data to it. You will see a field well called Field (not required) - ignore it. It exists only because Power BI will not display a custom visual that asks for no data at all. Leave it empty.
Step 2 - fill in the connection
Open the Format pane (the paint-roller icon) and expand API Setting.
If you type something the visual cannot use - a web address in the domain box, for example - the field's description turns into an explanation of what is wrong. Nothing is hidden from you.
Step 3 - say what to refresh
Expand Model Refresh Setting.
About Table Names
Use the names as they appear in the semantic model, which are often not the names you see in BI Book.
Open the model's Data view and copy the names from there. They are case sensitive - Budget and budget are different tables.
You can list several, separated by commas, semicolons or new lines.
About the Cooldown
A model refresh is a metered, relatively expensive operation, and this button hands the trigger to every person who can see the report. The cooldown is the only thing stopping someone clicking it repeatedly.
It is measured from the moment the previous refresh finished, so it means "time since the data was last actually made current". While it is counting down, the button is disabled and shows Ready in 8s.
Setting it to 0 removes the limit entirely. That is a deliberate choice to make, not a default.
Step 4 - test it
Click the button.
It should say Refreshing, with the icon spinning.
After a while it should say Refreshed 14:32 with a tick.
If the button is greyed out and will not click, hover over it - the tooltip says exactly which setting is missing or wrong.
Test against a test report and a test model first. The button's whole job is to spend a real refresh.
Step 5 - make it look right (optional)
Everything below this point is appearance. The button works without touching any of it.
Button card
Text - Label, font, colour, letter spacing.
Shape - the visual choices worth knowing about:
Text Color only applies to the Solid style. In the other three, the Background colour is the text colour - that is what makes them look like one design rather than two.
Icon - show or hide the refresh arrow, put it on either side, or choose Icon Only for a compact button. Icon Only keeps the label as the tooltip, so the button still makes sense to someone using a screen reader.
Interaction - Auto Hover Color works out the hover shade from your background, so it keeps matching if you change the colour later. Leave it on unless you have a specific shade in mind.
Last Refresh Info card
Two independent switches that add small lines of text under the button:
Turn on either, both, or neither. Last Updated Label lets you change the words - useful if your report is not in English.
Three more settings control how those lines are laid out:
Wrap Text matters most for the table list. A list that ends in … tells you there are more tables without telling you which, which is the opposite of what the setting is for. Turn wrapping off only when the visual is a short fixed-height tile - wrapped text grows downwards, and the visual clips rather than scrolls.
Alignment here is separate from the button's own Alignment on the Button card, so you can centre the button and left-align the text under it, or any other combination.
Both lines stay hidden until a refresh has actually been seen to succeed, so a freshly placed button shows nothing until it has something true to say.
What the button tells you
Success and failure are shown by shape as well as words - a tick or a warning triangle - so they are still distinguishable if you cannot easily tell colours apart, or if the button is on a dark background.
Troubleshooting
The button is greyed out. Hover over it. The tooltip names the missing or malformed setting. Every reason is something you can fix in the Format pane.
"Not authorised". Check the Tenant ID first - it must be your Microsoft Entra directory ID, not a BI Book identifier. Then check the API Key (copy it from a working Table Writeback visual rather than retyping), then the Company ID.
"Refresh error". Something upstream rejected the request. The full detail is in the browser console - press F12, open the Console tab, and filter on bibook. The visual never shows raw server messages on the page, because they can name workspaces and models the person reading the report is not entitled to see.
"Already refreshing". Not your fault and nothing to fix. A refresh of the same model is already running - someone else clicked, or a scheduled refresh is in progress. Wait for it.
Nothing happens when I click. Check the Cooldown has elapsed, and check the tooltip.
Known limitations
Worth knowing before you roll this out:
The in-progress status can be lost if you switch report pages. Power BI shuts a visual down when you leave its page. The visual tries to remember across that, but in tenants where an administrator has disabled local storage for custom visuals it cannot always. The refresh itself keeps running normally - only the on-screen status is affected.
The API Key is readable by anyone who can edit the report. It is stored in the report, in plain text, and it travels with the file if the report is exported or copied. Use a key scoped to this report, and have it rotated when the set of people who can edit the report changes.
The visual is English only, apart from the button label and the Last Updated label, which you can write yourself.
Who can click it
Anyone who can see the report. That is the point of the visual - a viewer can make the data current without edit rights on the model.
It also means the Cooldown setting is a real control rather than a nicety. Decide what it should be before you publish.
Was this helpful?
Still need help? Ask the team